Overview
In this article, we will set up a production-ready Airflow 3.0 DAG that uploads data to an AWS S3 external stage, then triggers a COPY INTO command to load that data into Snowflake — using a key-pair authenticated service account with least-privilege RBAC.
📝 Prerequisites
This guide assumes that you have Airflow 3.0 configured, and are familiar with writing DAGs and running them inside
Airflow. To get set up quickly on Apache Airflow (only for testing, not production), check out
this part of my basic Airflow + Snowflake guide.
This guide also assumes that you have access to a Snowflake account with admin privileges and an AWS account with
permissions to create IAM roles and S3 buckets. To sign up for a free Snowflake account, visit
signup.snowflake.com.
1. Configure AWS External Stage (S3, IAM role, policy, & user)
To begin, let's configure the S3 bucket and the IAM role/policy in AWS. We will need the ARN when we configure
the external stage in Snowflake. We will also create the policy and user that Airflow will use to push the data
to S3. Snowflake will be read-only to the bucket, and Airflow will be write-only to the bucket ensuring the least
privileges necessary are used.
Provision the S3 bucket:
- Navigate and sign into the AWS Web Console.
-
Navigate to S3 inside the AWS Web Console and select Create bucket. The configuration for this S3 bucket
can be left as default. When deploying on production, you should consider using lifecycle rules to automatically
delete old files.
💡 S3 Bucket and Snowflake Region
Ensure that the bucket is in the same region as your Snowflake account for optimal performance and minimal costs. This guide uses US East (N. Virginia) for both Snowflake and S3.
Create IAM Policy/Role
This step will follow along closely with the documentation from Snowflake listed below while focusing on the implementation. For additional details about why this is configured this way, please refer to this document:
Creating the policy
- Navigate to IAM from AWS Web Console Dashboard.
- From left-hand navigation, select Account settings.
- Under Security Token Service (STS) in the Endpoints list, find the region your Snowflake account is located in and ensure that STS status is enabled.
- From left-hand navigation pane, select Policies.
- Select Create policy.
- For Policy editor, select JSON.
-
Copy and paste the following policy; replace
<bucket>with the appropriate values for your S3 bucket and prefix.Source: Snowflake — Configure Secure Access to Amazon S3 { "Version": "2012-10-17", "Statement": [ { "Effect": "Allow", "Action": [ "s3:GetObject", "s3:GetObjectVersion" ], "Resource": "arn:aws:s3:::snowflake-external-stage-example/*" }, { "Effect": "Allow", "Action": [ "s3:ListBucket", "s3:GetBucketLocation" ], "Resource": "arn:aws:s3:::snowflake-external-stage-example" } ] }
Snowflake read-only IAM policy in AWS JSON editor 💡 Production Note:
When implementing for production, you would want to scope the
ListBucketto a specific prefix. - Select Create policy.
- Note the policy name; we will use this when we create the role below.
- From the left-hand navigation pane, select Roles.
- Select Create role.
- Select AWS account as the trusted entity type.
- Select Another AWS account.
- Enter your own AWS account ID in the Account ID field for now. Later, this will be modified to grant access to Snowflake.
-
Select the Require external ID option. Enter a placeholder like
0000for now. This will be modified later to grant access to Snowflake. - Select Next, then attach the policy you created above.
- Enter a name and description, then select Create role.
- Lastly, on the role summary page, locate and record the Role ARN value. We will use this value when we configure the Snowflake integration that references this role.

Creating the Airflow IAM User
To put the data in S3, our external stage for Snowflake, we will need an IAM user with an Access Key ID
and Secret Access Key. This user will have a policy attached to ensure that it only has write-only
access to the bucket we created.
- Navigate to IAM from AWS Web Console Dashboard.
- From left-hand navigation pane, select Policies.
- Select Create policy.
- Select JSON for the Policy Editor.
-
Enter the following policy using your bucket name:
{ "Version": "2012-10-17", "Statement": [ { "Effect": "Allow", "Action": [ "s3:PutObject" ], "Resource": "arn:aws:s3:::snowflake-external-stage-example/*" } ] } - Select Next.
-
Name your policy and give it a description, then select Create policy.
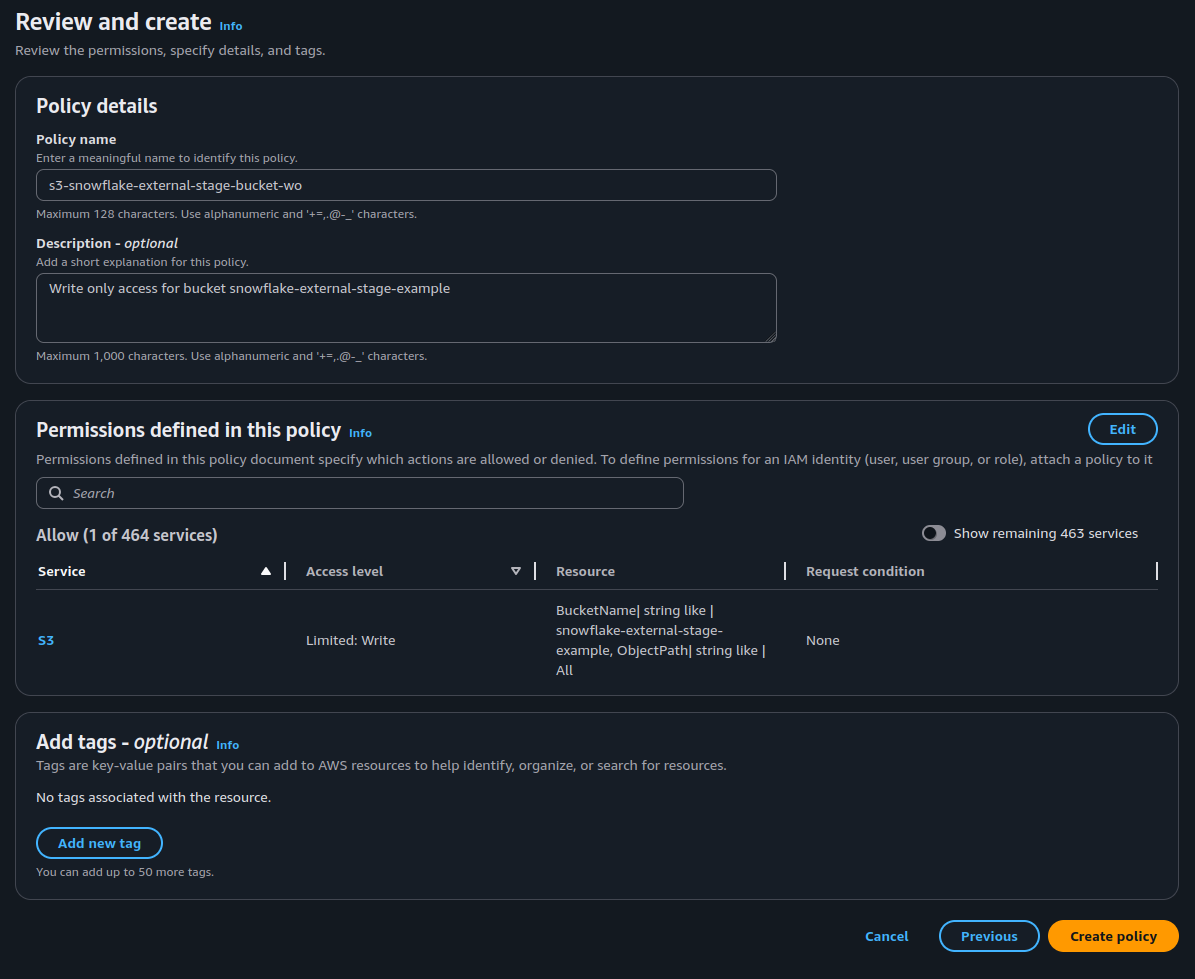
AWS write-only policy that will be used for Airflow user to push data to S3. - Now select Users from the left-hand navigation.
- Select Create user.
- Name your user (i.e. airflow_service_user) and select Next.
-
Select
Attach policies directly, then search for the policy you made in the list and select it.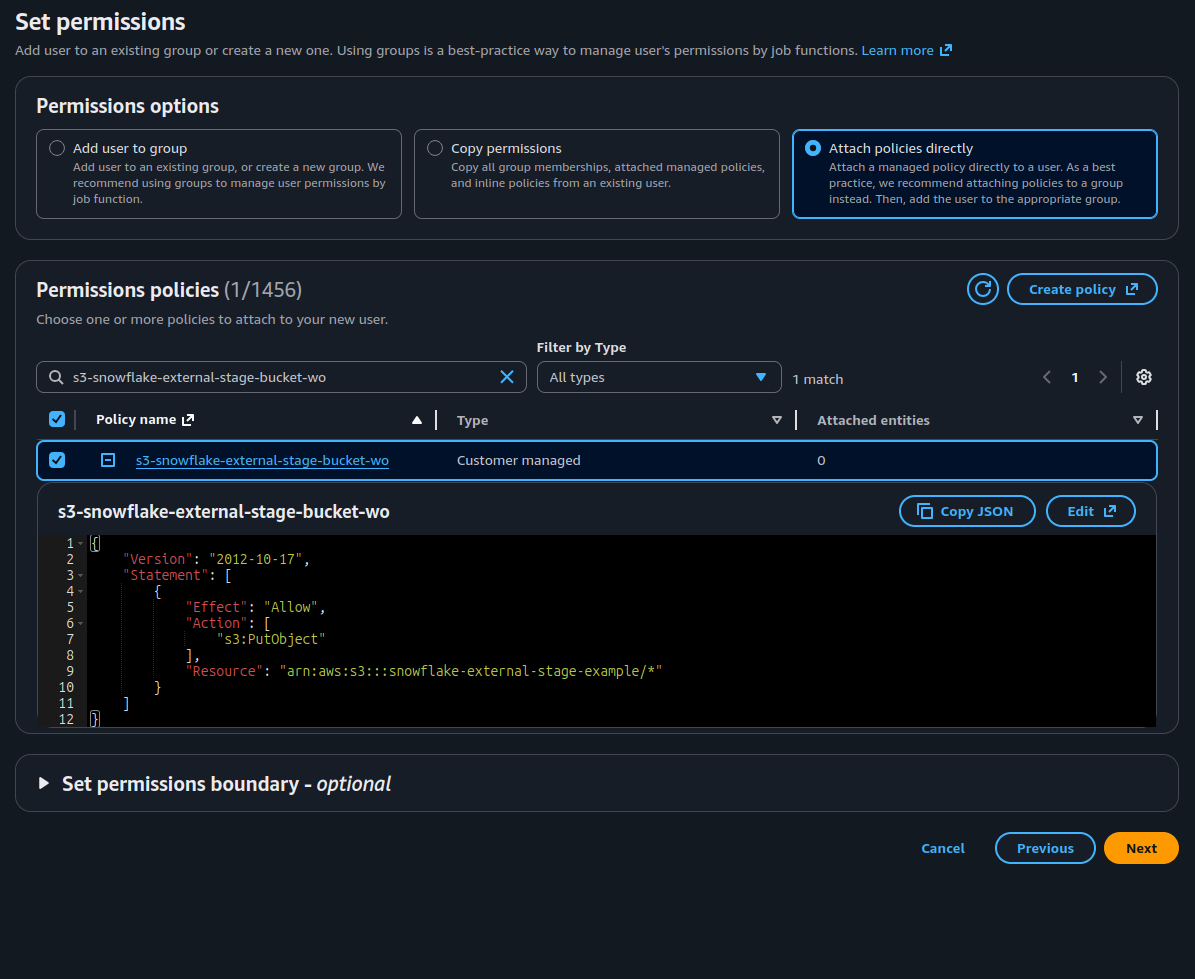
AWS Web console picturing user creation and policy attachment. - Select Next then Create user.
- Select the user you created from the list, then Security credentials.
- From this window, select Create access key.
-
For Access key best practices & alternatives, select Other unless your setup
requires a different authentication configuration.
📝 AWS Account Permissions and Authentication
This guide does not go into deeper detail on the AWS configuration, but if your Airflow instance is hosted on a resource in AWS, use authentication associated with that instance rather than Access Keys. Follow the warning AWS gives you regarding access keys; never commit them to a code repository, store them in plain text, store them in code, and rotate them regularly.
- Give the access key a description (i.e. Airflow access) and select Create access key.
- Record your Access Key and Secret Access Key in a safe place. I typically use a password manager for this like Bitwarden. We will use these values later inside of Airflow.
2. Configure Snowflake
We will need to go back to the AWS console to give Snowflake the access it needs, but let's move over to create the storage integration in Snowflake. For more details about this process, please refer to Snowflake's documentation linked above in step 1.
Create Storage Integration
📝 Account Permissions
Only users with the ACCOUNTADMIN role or with the global CREATE INTEGRATION privilege can execute the command below.
- Navigate and sign into your Snowflake instance.
- Select + Add New then SQL Worksheet at the top of the page.
-
Copy and paste the following command into the SQL worksheet editor:
CREATE STORAGE INTEGRATION s3_int
  TYPE = EXTERNAL_STAGE
  STORAGE_PROVIDER = 'S3'
  ENABLED = TRUE
  STORAGE_AWS_ROLE_ARN = 'arn:aws:iam::001234567890:role/myrole'
  STORAGE_ALLOWED_LOCATIONS = ('s3://<your-bucket-name>/');
⚠️ Production Note:
Note that
STORAGE_ALLOWED_LOCATIONSshould be explicit to your bucket, and not'*'to ensure least-privileged access. -
Run the following command to retrieve the Snowflake-managed IAM User ARN and External ID — you will need both values to configure the trust relationship in AWS:
DESC INTEGRATION <integration_name>;After running
DESC INTEGRATION s3_int, you should see output similar to the following. Note theSTORAGE_AWS_IAM_USER_ARNandSTORAGE_AWS_EXTERNAL_IDvalues — you will need these to update the IAM trust policy in AWS.Source: Snowflake — Configure Secure Access to Amazon S3 +---------------------------+---------------+--------------------------------------------------------------------------------+------------------+ | property | property_type | property_value | property_default | +---------------------------+---------------+--------------------------------------------------------------------------------+------------------| | ENABLED | Boolean | true | false | | STORAGE_ALLOWED_LOCATIONS | List | s3://mybucket1/mypath1/,s3://mybucket2/mypath2/ | [] | | STORAGE_BLOCKED_LOCATIONS | List | s3://mybucket1/mypath1/sensitivedata/,s3://mybucket2/mypath2/sensitivedata/ | [] | | STORAGE_AWS_IAM_USER_ARN | String | arn:aws:iam::123456789001:user/abc1-b-self1234 | | | STORAGE_AWS_ROLE_ARN | String | arn:aws:iam::001234567890:role/myrole | | | STORAGE_AWS_EXTERNAL_ID | String | MYACCOUNT_SFCRole=2_a123456/s0aBCDEfGHIJklmNoPq= | | +---------------------------+---------------+--------------------------------------------------------------------------------+------------------+
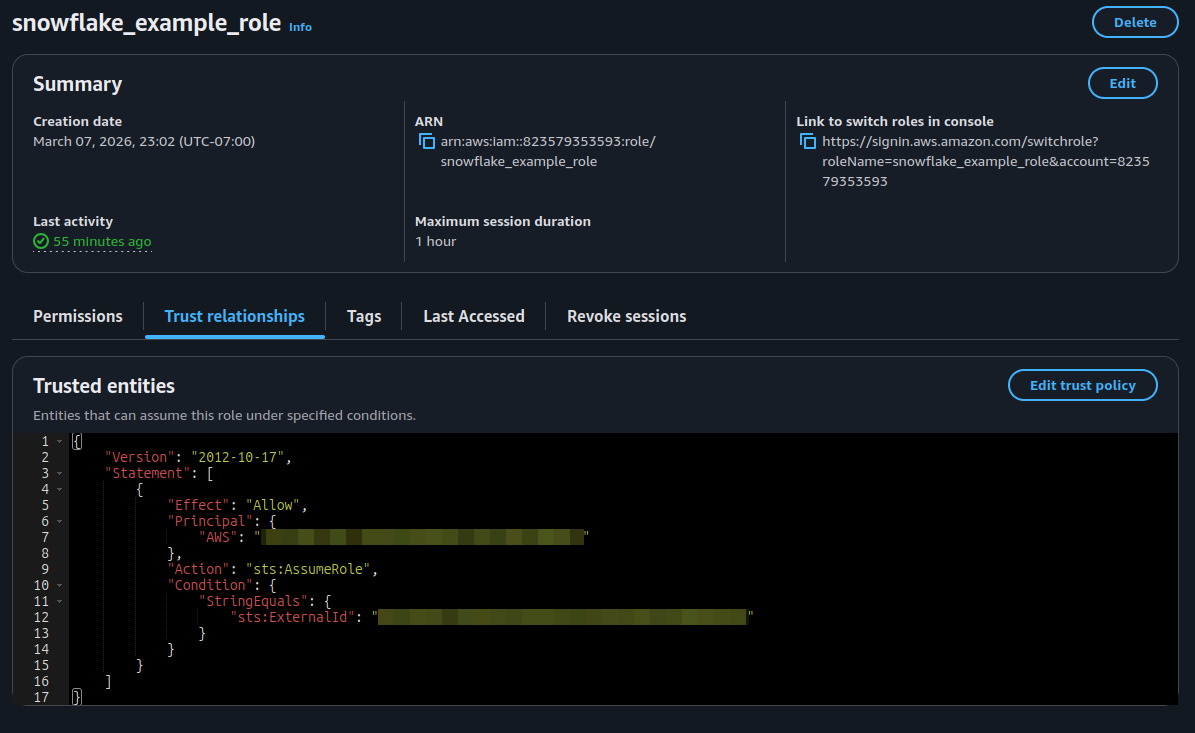
Switching back to AWS: Update the IAM Role Trust Policy
- Navigate back to AWS Web Console.
- Select IAM.
- From the left-hand navigation, select Roles.
- Select the role you created above.
- Select the 'Trust relationships' tab.
- Select 'Edit trust policy'.
-
Update the trust policy with the values we recorded in the Snowflake configuration:
Source: Snowflake — Configure Secure Access to Amazon S3 { "Version": "2012-10-17", "Statement": [ { "Sid": "", "Effect": "Allow", "Principal": { "AWS": "<snowflake_user_arn>" }, "Action": "sts:AssumeRole", "Condition": { "StringEquals": { "sts:ExternalId": "<snowflake_external_id>" } } } ] } - Select 'Update policy'.
Create the Snowflake Database and Schema
I will create a new database for this project, but you can just as easily use an existing database. Permissions may not look the same depending on the existing configuration though.
In the SQL worksheet we created earlier, execute the following two SQL commands:
CREATE DATABASE airflow_snowflake_db;CREATE SCHEMA airflow_snowflake_db.etl;Create External Stage
First, make sure your context is correct by running the USE commands below:
USE DATABASE airflow_snowflake_db;USE SCHEMA etl;Run SHOW INTEGRATIONS; to confirm your external stage appears.
📝 Non-ACCOUNTADMIN Users
If you are not running as ACCOUNTADMIN, the role you are using to create the stage will need
the following privileges granted by an administrator before proceeding:
-- Allow the role to create stages in the schema
GRANT CREATE STAGE ON SCHEMA airflow_snowflake_db.etl TO ROLE <your_role>;

-- Allow the role to use the storage integration
GRANT USAGE ON INTEGRATION s3_int TO ROLE <your_role>;
Now create the stage:
CREATE STAGE airflow_snowflake_db.etl.s3_stage
  STORAGE_INTEGRATION = s3_int
  URL = 's3://snowflake-external-stage-example/'
  FILE_FORMAT = (TYPE = CSV);
Create User in Snowflake for Airflow
Next, we will create the user and role in Snowflake that Airflow will use to trigger the COPY INTO command. This implements key-pair authentication for improved security over basic username/password authentication, and better fits the model of a service account interacting with Snowflake. This portion follows Snowflake's official key-pair authentication documentation closely:
First, let's generate the key pair on your local system. Open a terminal and run the following:
💡 Note:
When testing, it seems that the Airflow connection requires an encrypted private key; this will be used when we create the Airflow connection, specifically for the "password" field.
Generate the private key:
openssl genrsa 2048 | openssl pkcs8 -topk8 -v2 des3 -inform PEM -out rsa_key.p8Then generate the public key:
openssl rsa -in rsa_key.p8 -pubout -out rsa_key.pubNow that we have the private and public keys, let's go ahead and create the user/role for our service account. The SQL below can be run in the SQL worksheet we created in the last section in the Snowflake UI. This will create a basic role and user with grants to insert and read from tables on our schema. If you need delete permissions, alter the grant below accordingly.
-- Create the service role
CREATE ROLE airflow_service_role;

-- Create the service user
CREATE USER airflow_service_user
    DEFAULT_ROLE = airflow_service_role
    DEFAULT_WAREHOUSE = COMPUTE_WH
    DEFAULT_NAMESPACE = airflow_snowflake_db.etl;

-- Assign the role to the user
GRANT ROLE airflow_service_role TO USER airflow_service_user;

-- Grant warehouse usage
GRANT USAGE ON WAREHOUSE COMPUTE_WH TO ROLE airflow_service_role;

-- Grant database usage
GRANT USAGE ON DATABASE airflow_snowflake_db TO ROLE airflow_service_role;

-- Grant schema usage
GRANT USAGE ON SCHEMA airflow_snowflake_db.etl TO ROLE airflow_service_role;

-- Grant table privileges (line 1 is currently existing tables, line 2 is future tables)
GRANT INSERT, SELECT ON ALL TABLES IN SCHEMA airflow_snowflake_db.etl TO ROLE airflow_service_role;
GRANT INSERT, SELECT ON FUTURE TABLES IN SCHEMA airflow_snowflake_db.etl TO ROLE airflow_service_role;

-- Grant stage usage
GRANT READ, WRITE ON STAGE airflow_snowflake_db.etl.s3_stage TO ROLE airflow_service_role;

-- Grant storage integration usage
GRANT USAGE ON INTEGRATION s3_int TO ROLE airflow_service_role;

-- Test database creation
CREATE TABLE airflow_snowflake_db.etl.employee_records (
    employee_id INT,
    first_name VARCHAR,
    last_name VARCHAR,
    email VARCHAR,
    department VARCHAR,
    job_title VARCHAR,
    salary DECIMAL(10,2),
    hire_date DATE,
    is_active BOOLEAN
);
💡 Production Note:
In a production environment with multiple teams, you would grant MODIFY PROGRAMMATIC
AUTHENTICATION METHODS to a dedicated service owner role rather than managing key assignment
directly as ACCOUNTADMIN.
Now we can add the RSA public key to the user.
ALTER USER airflow_service_user SET RSA_PUBLIC_KEY='<Your key here we generated above>';3. Configure Airflow
Now that Snowflake is configured and ready for our data, we can move over to Apache Airflow to orchestrate our ETL pipeline. You could implement this in vanilla Python, or other programming languages as well — it would just change how you connect and execute commands.
To set up the connection in Airflow, we will want to navigate to the Airflow web UI, Admin > Connections > + Add Connection. From here, fill out the fields required.
Fields required:
- Connection ID: A unique name of your choice, you'll reference this in the DAG.
- Connection Type: Snowflake
- Login: The Snowflake user we created above.
- Password: Private key passphrase we created above.
- Schema: The schema you would like to push to.
- Switch to the 'Extra Fields' tab.
-
Account: The Snowflake account name, found in the URL when logged into Snowflake (i.e. <Account>.snowflakecomputing.com).
💡 Tip:
To get your account ID, click on your profile icon/name at the bottom left of the Snowflake Web UI, then select Connect a tool to Snowflake. From here, you can copy your Account Identifier and paste it in this field in Airflow.
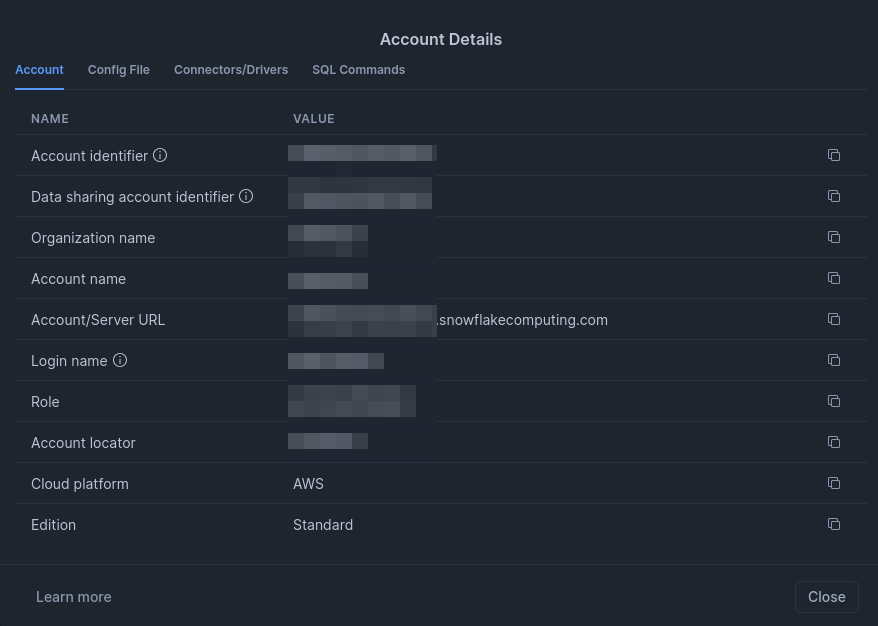
Snowflake Account Summary - Warehouse: The Snowflake warehouse to use for the connection (i.e. COMPUTE_WH).
- Database: The Snowflake database to use for the connection.
-
Region: Leave this blank if you are using the org-based account identifier format
(
ORGNAME-ACCOUNTNAME). This format already encodes region information, so populating this field will cause a conflict and result in a 404 error when Airflow attempts to connect. - Role: The Snowflake role we created above.
- Private Key Path: The path to the private key file associated with the public key we added to the Snowflake user.
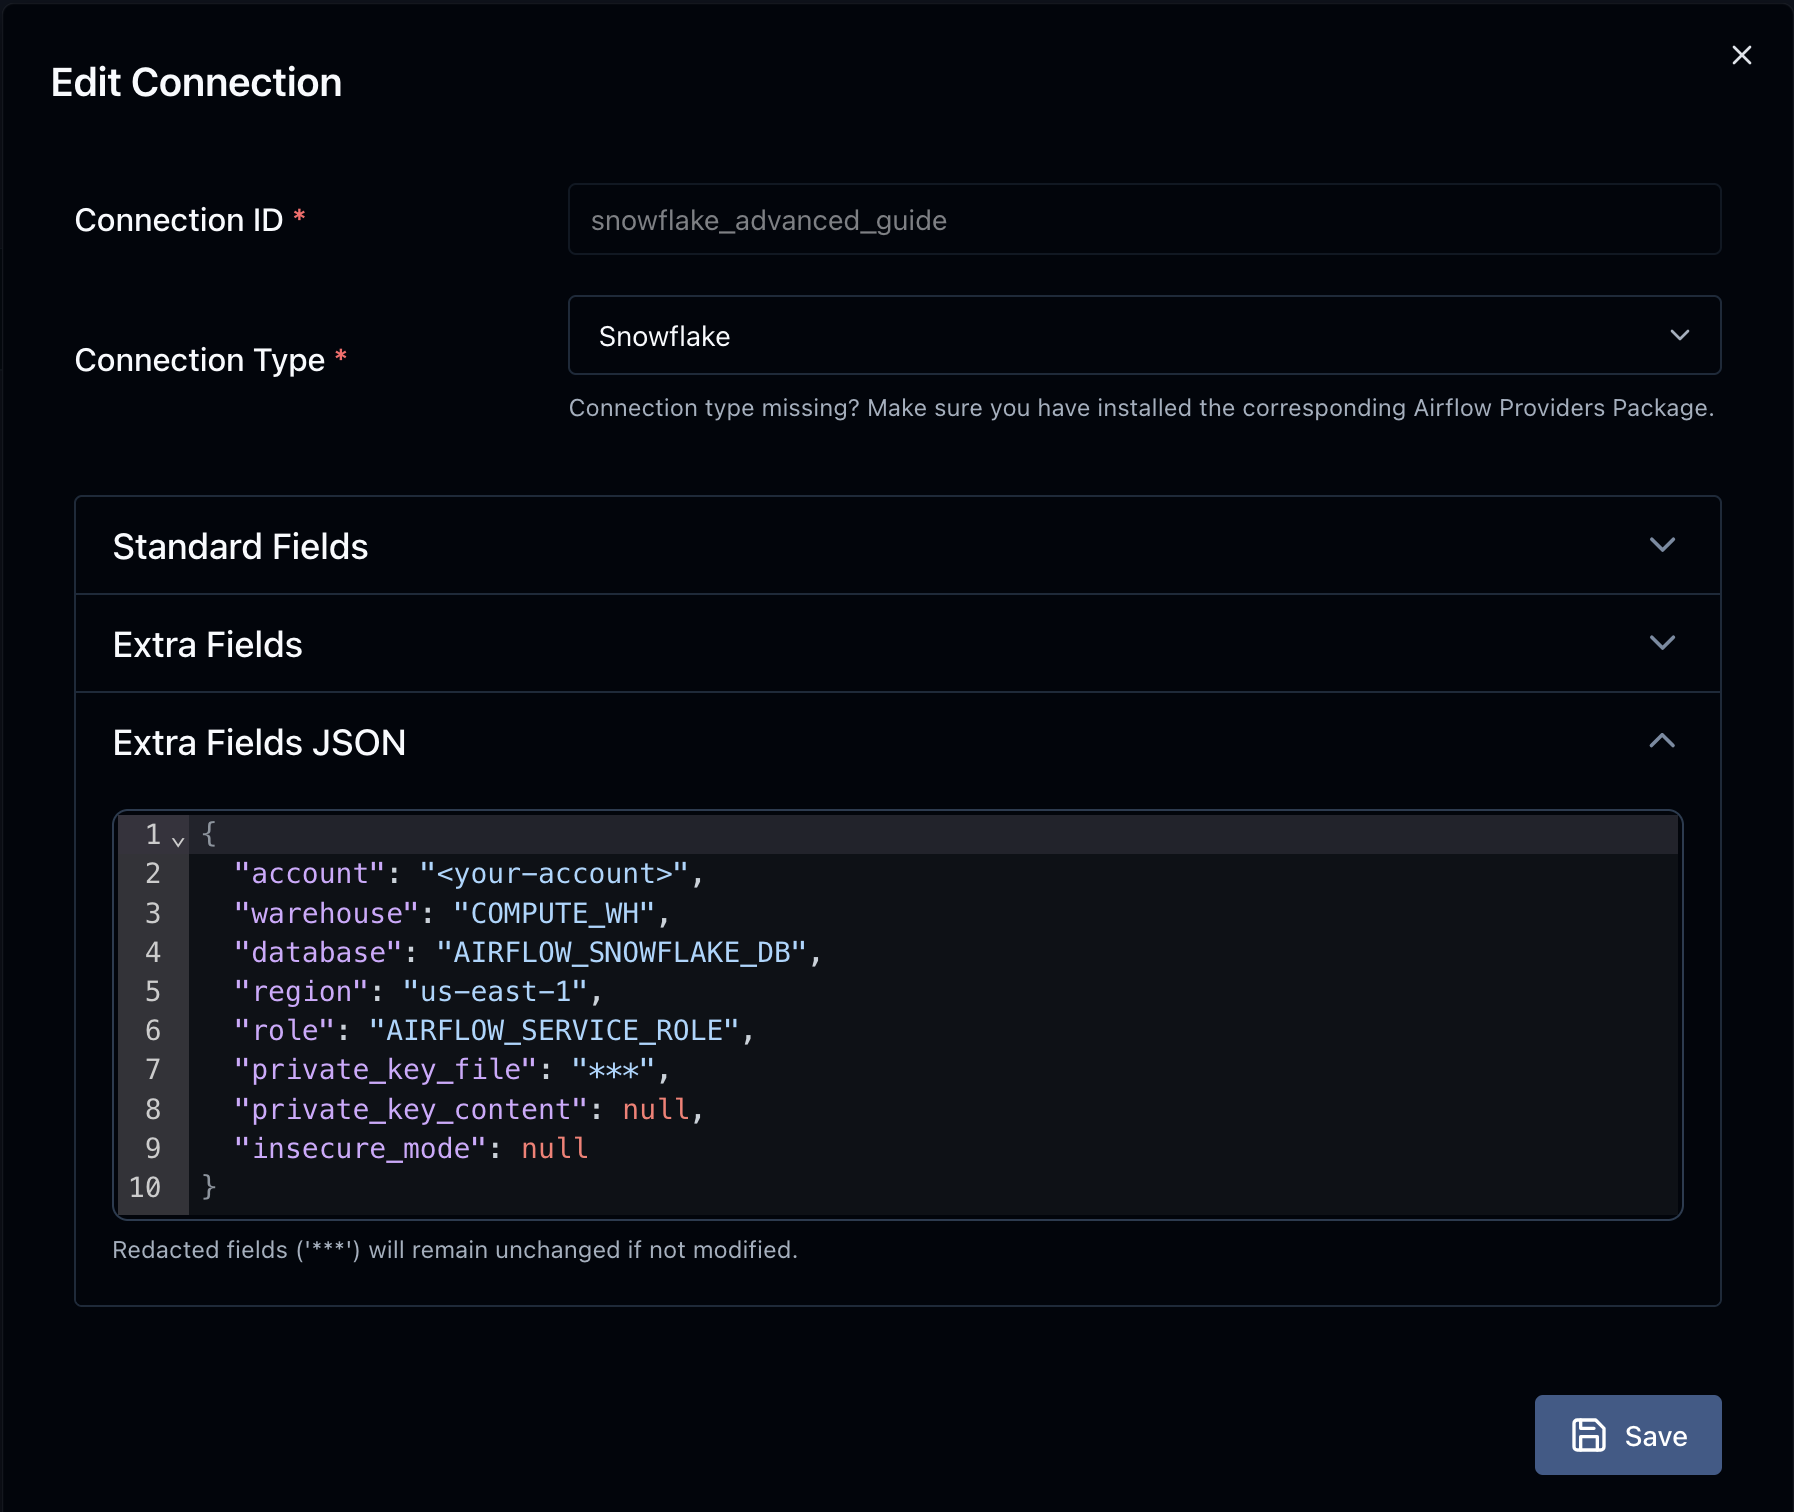
💡 Tip:
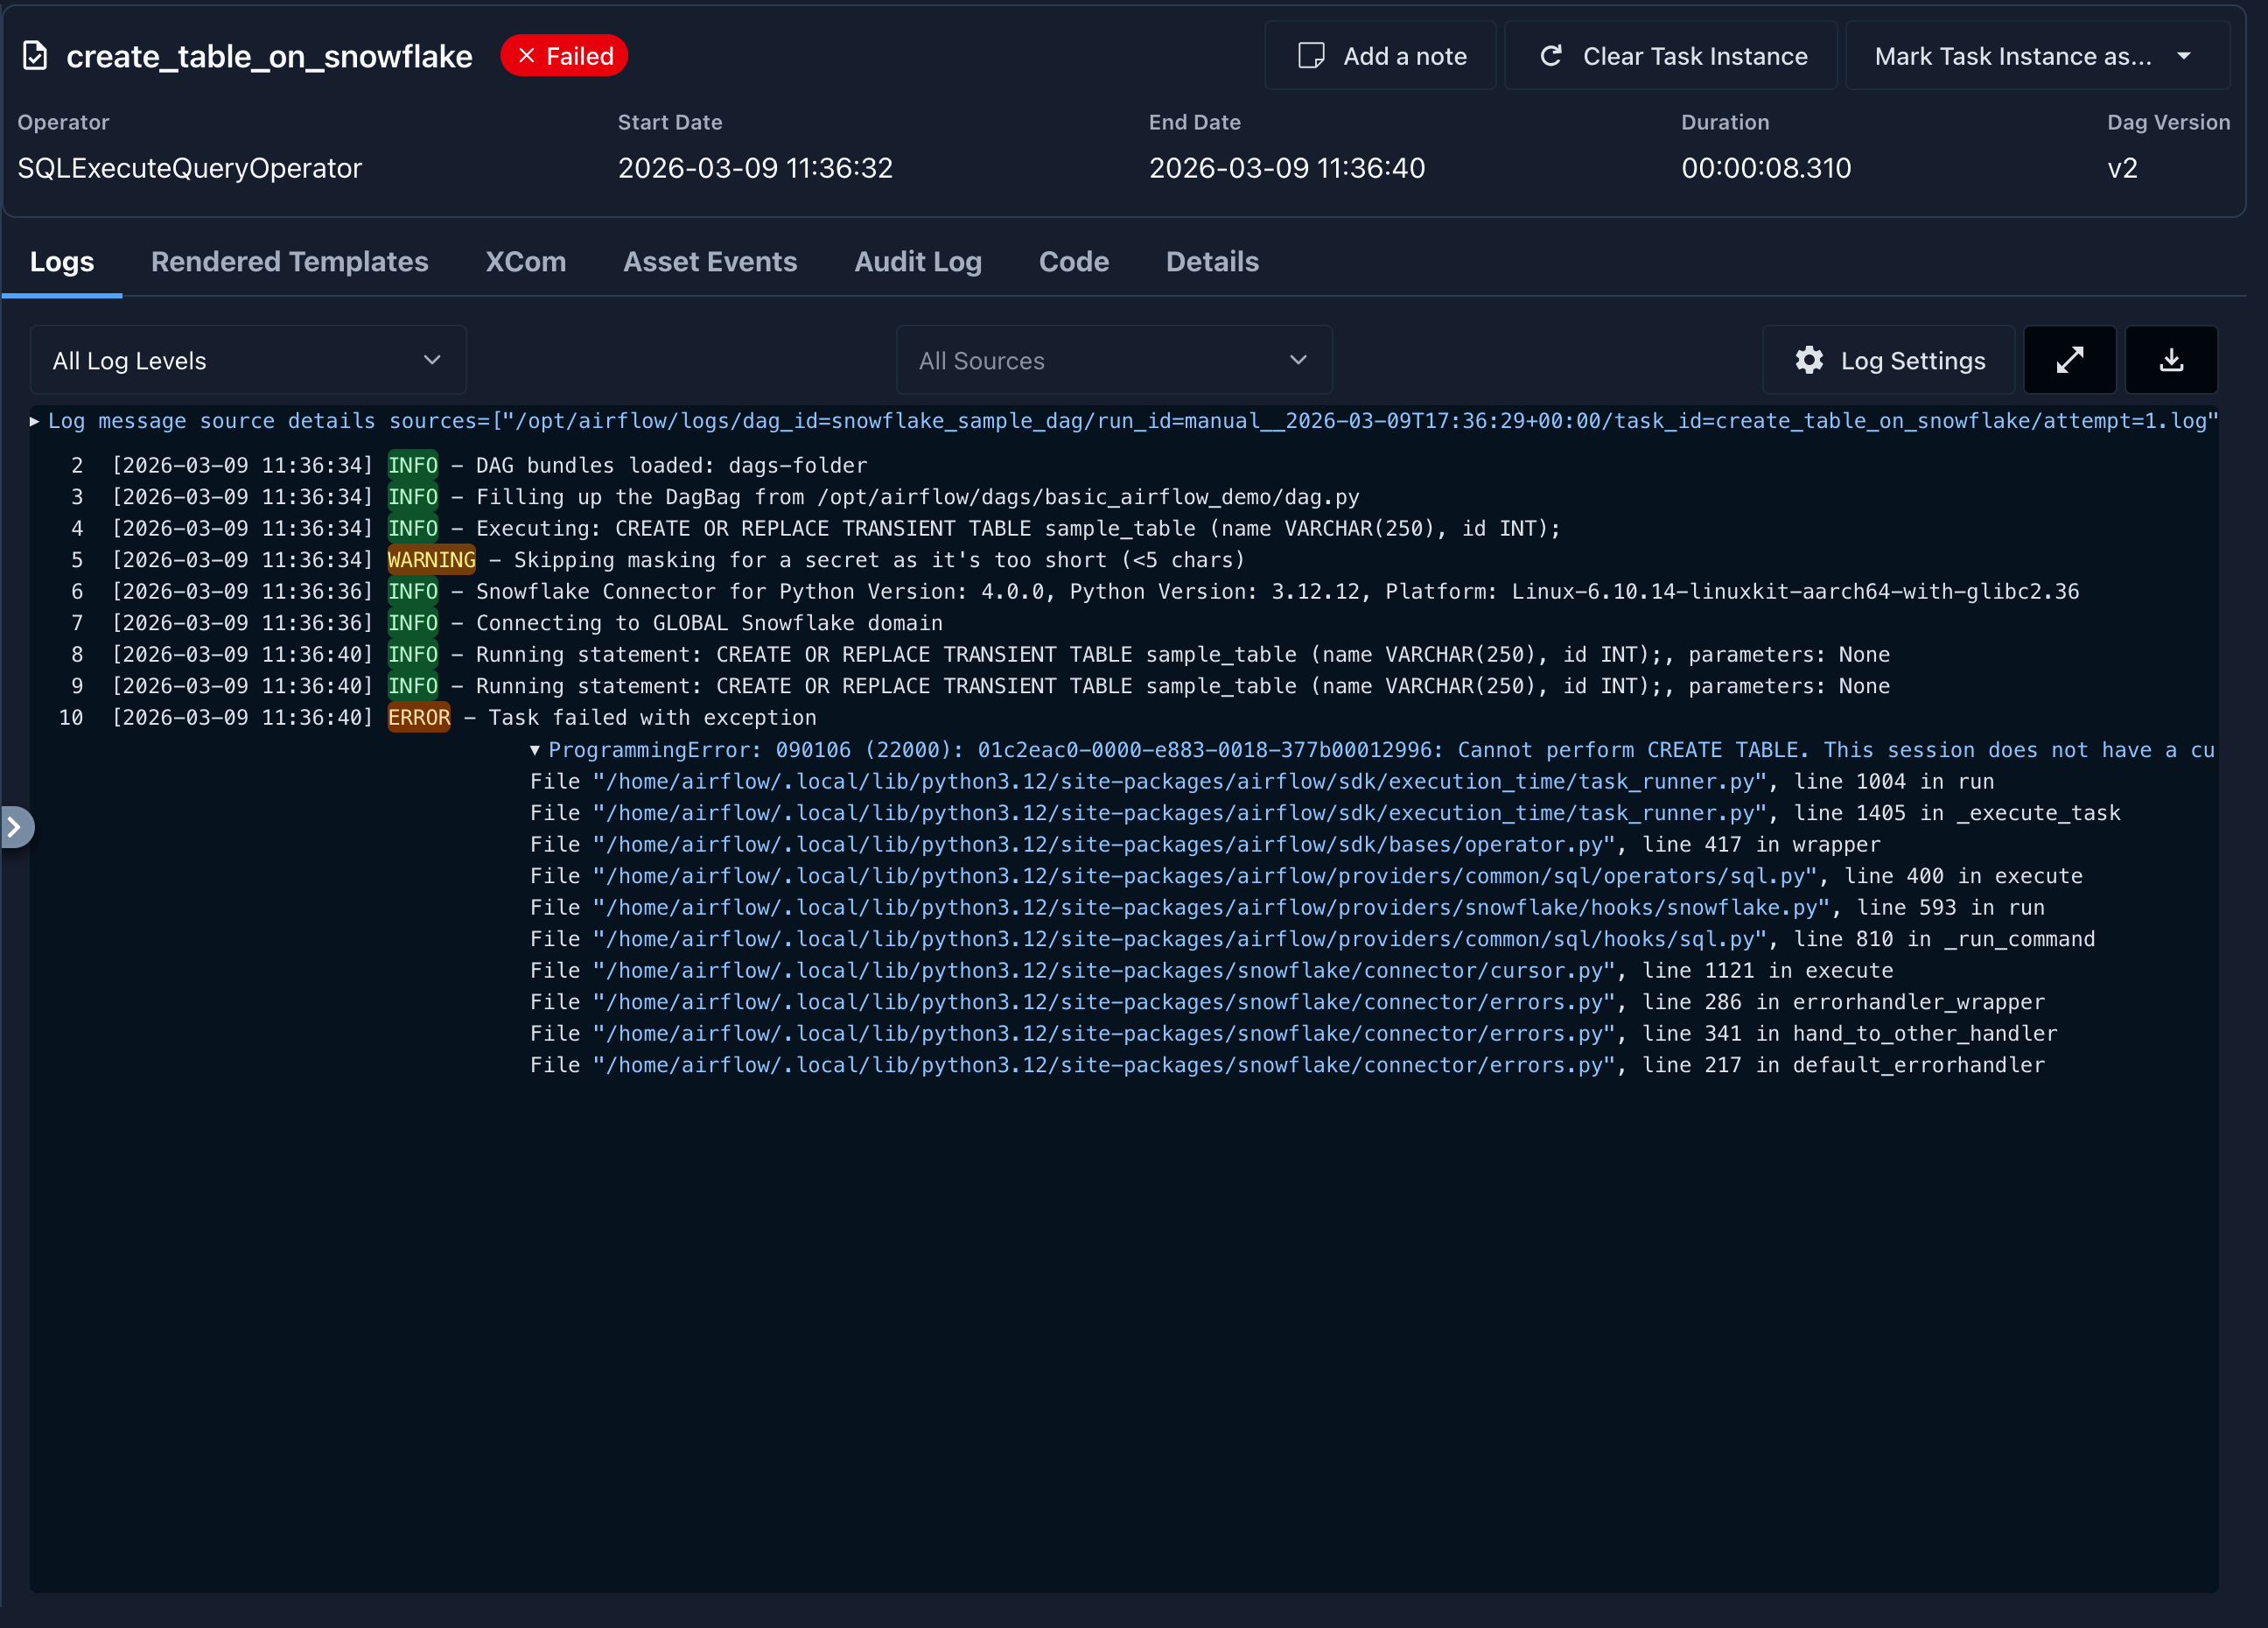
To get this working properly, I had to use the path to the private key file rather than the private key file contents, then test with a simple DAG. Using the DAG from the basic guide you can easily replace the connection ID, and test to see if it works. It will error out because of the permissions we have set, but you should see that it complains about the SCHEMA, not the username/password:
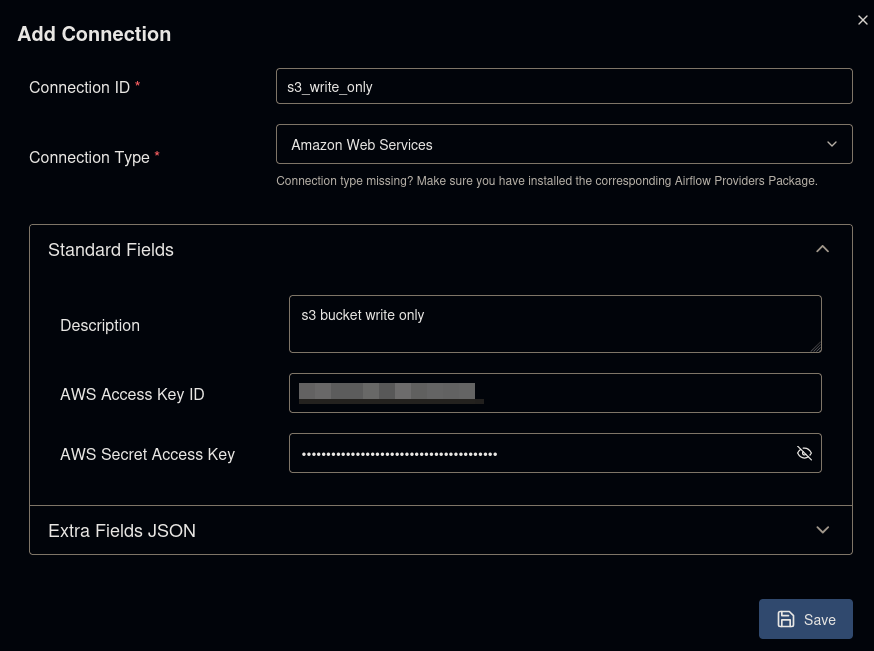
If you have not already, we will also need to create the connection used for S3. To do so, click + Add Connection again. Then configure the connection as pictured below.
Writing the DAG
Now that we have confirmed we have a working connection between Airflow and Snowflake using key-pair authentication,
let's go ahead and move on to writing the DAG to upload the data to the staging environment (S3), then trigger the
COPY INTO command to load the file into Snowflake.
Create dag.py in your favorite editor and add the following code:
# Imports
import pendulum
# Airflow Imports
from airflow.sdk import dag, task
from airflow.providers.common.sql.operators.sql import SQLExecuteQueryOperator
from airflow.providers.amazon.aws.operators.s3 import S3CreateObjectOperator
# Constants
SNOWFLAKE_CONN_ID = "snowflake_demo"
AWS_CONN_ID = "s3_write_only"
# Test data to upload
DATA="""employee_id,first_name,last_name,email,department,job_title,salary,hire_date,is_active
1,James,Anderson,[email protected],Engineering,Senior Data Engineer,115000.00,2021-03-15,true
2,Sarah,Mitchell,[email protected],Engineering,Data Engineer,92000.00,2022-07-01,true
3,Carlos,Rivera,[email protected],Analytics,Data Analyst,78000.00,2021-11-20,true
4,Emily,Chen,[email protected],Engineering,Staff Engineer,138000.00,2019-05-10,true
5,Marcus,Thompson,[email protected],Analytics,Senior Analyst,95000.00,2020-09-14,true
6,Priya,Patel,[email protected],Engineering,Data Engineer,88000.00,2023-01-08,true
7,Jordan,Williams,[email protected],Product,Product Manager,125000.00,2020-04-22,true
8,Rachel,Kim,[email protected],Engineering,Junior Data Engineer,72000.00,2023-06-19,true
9,Derek,Sullivan,[email protected],Analytics,Data Analyst,76000.00,2022-03-30,false
10,Aisha,Johnson,[email protected],Engineering,Senior Data Engineer,118000.00,2020-12-01,true
11,Tyler,Brooks,[email protected],DevOps,Platform Engineer,108000.00,2021-08-17,true
12,Natalie,Torres,[email protected],Analytics,BI Developer,89000.00,2022-05-03,true
13,Kevin,Park,[email protected],Engineering,Data Engineer,91000.00,2022-10-11,true
14,Olivia,Martinez,[email protected],Product,Associate PM,82000.00,2023-03-27,true
15,Brandon,Lewis,[email protected],Engineering,Staff Engineer,142000.00,2018-11-05,false
"""
@dag(
'snowflake_advanced_dag',
schedule='@once',
start_date=pendulum.datetime(2026, 3, 10, tz='UTC'),
catchup=False,
tags=['snowflake', 'etl'],
)
def snowflake_advanced_dag():
# Step 1: Push file to s3
# Ref: https://airflow.apache.org/docs/apache-airflow-providers-amazon/stable/operators/s3/s3.html#create-an-amazon-s3-object
create_object = S3CreateObjectOperator(
task_id="push_file_to_s3",
s3_bucket="snowflake-external-stage-example",
s3_key="employee_records.csv",
data=DATA,
replace=True,
aws_conn_id=AWS_CONN_ID,
)
# Step 2: Trigger COPY INTO command on snowflake
# Ref: https://airflow.apache.org/docs/apache-airflow-providers-snowflake/stable/operators/snowflake.html
copy_into_snowflake = SQLExecuteQueryOperator(
task_id="copy_into_snowflake",
conn_id=SNOWFLAKE_CONN_ID,
sql="""
COPY INTO airflow_snowflake_db.etl.employee_records
FROM @airflow_snowflake_db.etl.s3_stage/employee_records.csv
FILE_FORMAT = (TYPE = CSV SKIP_HEADER = 1)
ON_ERROR = 'ABORT_STATEMENT';
""",
)
# Task Invocation
create_object >> copy_into_snowflake
# Dag invocation
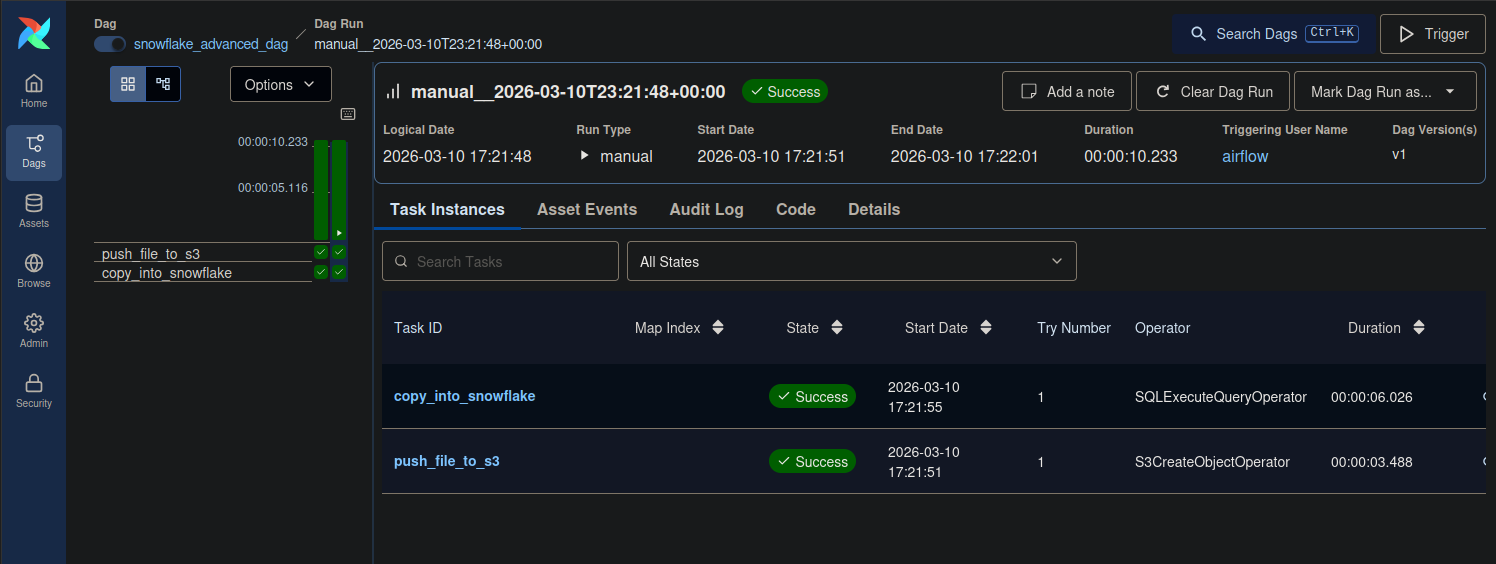
snowflake_advanced_dag()After you have the code in place, it should automatically be visible in the Airflow UI. Navigate to the DAG and run the DAG. You should see that both tasks — upload to S3 and COPY INTO — ran successfully!
Conclusion
You've now built a production-ready pipeline — RBAC, key-pair authentication, S3 staging, and bulk loading into Snowflake via COPY INTO. The next guide I am writing will cover uploading larger files to the staging area and loading into Snowflake.
If you have any questions or feedback, please reach out via the contact page.